Conference guide
In preparation for the conference
To have the best possible experience at ApacheCon @Home please we have prepared the following checklist for you to prepare beforehand. Take a look at the following technical requirements and things you can do to prepare before the conference so you don't need to do them during the conference.
Register
Be sure that you're registered for ApacheConf @Home at Hopin, if there is a message top right saying "You're in!" that means you are. Take the opportunity to add the conference duration to your calendar by clicking on "Add to calendar"
Internet speed
Try to connect with a minimum of 5Mbit/s download and 2Mbit/s upload speed. The higher upload and download speeds will offer a better experience, ideally 30Mbit/s download and 10Mbit/s upload speed. Try limiting other consumers of your Internet capacity, e.g. try running software updates a day before to prevent them from running during the conference, pause or stop any large downloads, if need be disconnect other devices from your network. Using a physical cable connection is recommended. You can check your Internet speed by using an online network speed test website, search for Internet speed test.
Web browser
Hopin supports Google Chrome (preferred) and Mozilla Firefox (backup) other browsers are not supported. Please make sure that your browser version is up to date, follow the instructions for Google Chrome and Mozilla Firefox.
Note that Safari uses the same engine as Chrome, but anecdotal reports are that Safari causes problems, so please use Chrome instead.
Reduce the number of open tabs and disable unnecessary browser extensions. Try not to open several browser tabs with Hopin, or if you need to mute all but one of the tabs.
Device
Do try using a desktop or laptop computer, if you're using a tablet or a mobile device make sure that you're using Google Chrome or Mozilla Firefox.
Documentation
Browse the documentation on Hopin tailored for attendees and speakers.
Setup profile
Fill in your Hopin profile to help with conference networking and finding like-minded folk. Put only the information you are comfortable sharing online.
Select sessions
Browse the tracks pages and make a selection of the sessions that interest you. Next to each session, you'll find the calendar (📅) icon, clicking on it will provide you with the iCalendar (.ical) file that you can import in your calendaring software. Clicking on the date and time of the session will lead you to an online service that you can use to convert the session time to different timezones. Times shown above the session timeline reflect times in your local timezone, so make sure your computer has the correct timezone configured for your locality.
During the conference
During the conference you might run into some issues, we have compiled a list of most common ones, and general recommendations to avoid them.
Audio and Video
Here is a list of recommendations for the best experience with audio and video during the conference:
- To maximize speaker video or presentation video double click on that video stream, this will enlarge that portion of the video stream.
- Play audio using headphones, this will help in understanding the speaker, and prevent any audio feedback during the networking part.
- Be attentive to prompts asking you to allow access to microphone or camera, once denied you need to explicitly allow access. Consult the documentation on allowing access in Firefox and Chrome.
Notes for speakers
As a speaker please take into consideration the points mentioned above, and also in addition to that the following.
Conference support on Slack
As a speaker access the ApacheConf Slack and set up your account. We will be providing support on the #speaker-help channel.
Slides template
We have prepared a web-based slides template (preview) that you can use.
There's also a PowerPoint template.
(You are not required to use these templates, but you may if you want.)
For your session
The session starts 5 minutes before the scheduled time and is being recorded until the last person leaves the session. Please do join the session 5 minutes before it starts to test your slides, audio, and video setup.
Sharing screen
When you enter the session you can control screen sharing using the monitor icon in the row with four buttons along the bottom. If the icon is crossed with a red line that means you're not sharing your screen, click on the icon to start sharing.
On Linux desktops using Wayland sharing the screen in Firefox is somewhat involved. You might need to confirm twice what part of the screen you want to share. To help you share the screen in Firefox we have prepared the following video.
Similarly using Chrome (or Chromium) on Linux desktop using Wayland sharing the whole screen might end up exposing a completely black screen. In that case, make sure that you're sharing the window of a single application or single tab within Chrome. The following video illustrates that.
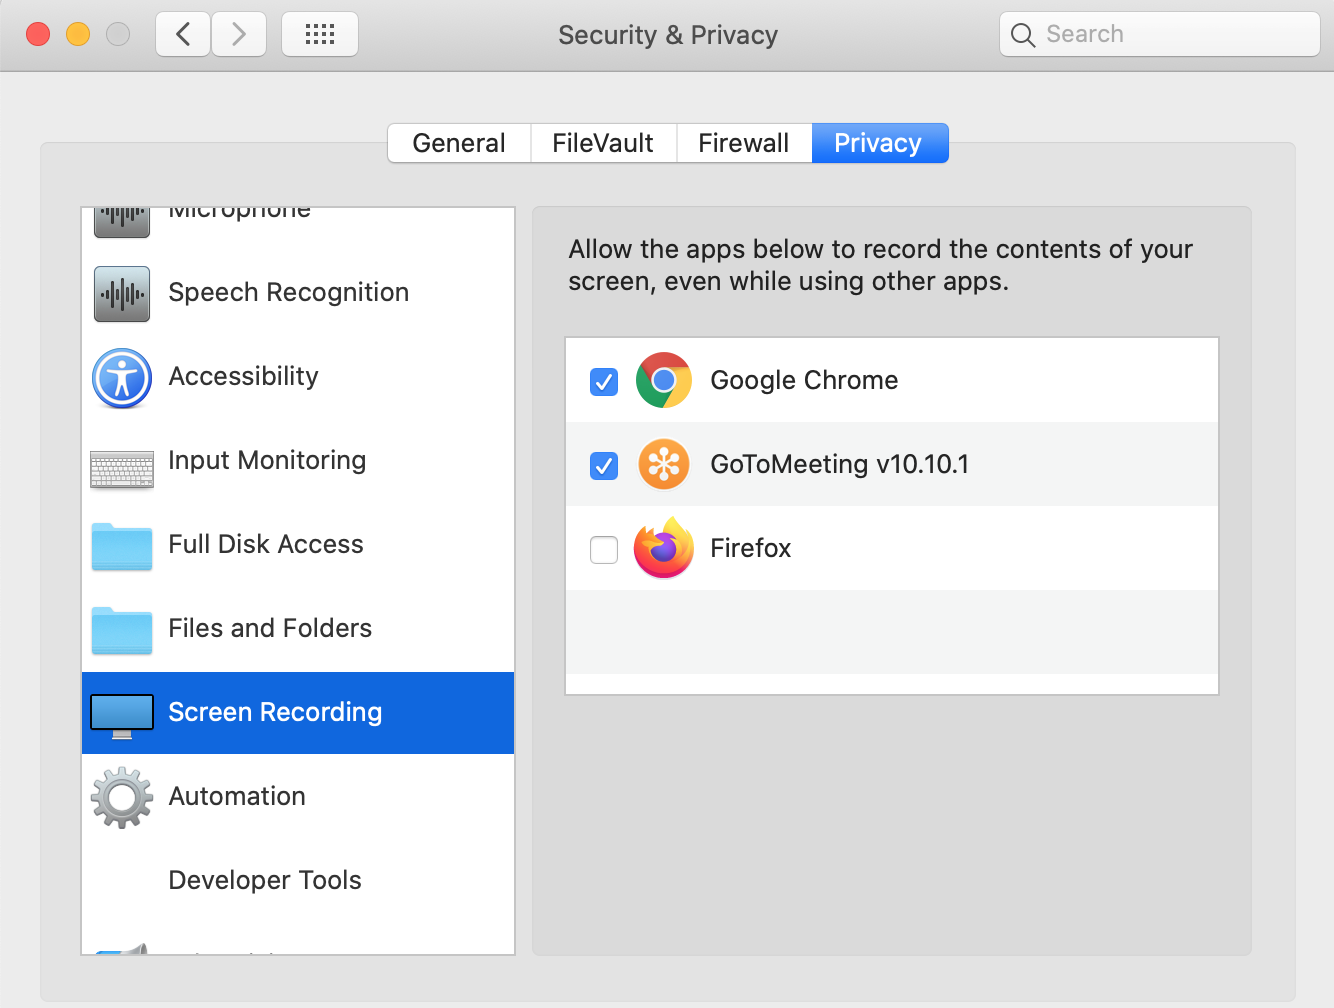
On Mac, you may have to alter security preferences to allow screen sharing:
If you are not able to share, look under SystemPreferences -> Security & Privacy -> Screen Recording. Click on Google Chrome to enable sharing application windows. Please note changing the settings will close Google Chrome and you will need to open the Google Chrome again and rejoin Hopin session.
Playing audio as a part of the presentation
As you play sounds from videos or as a part of the presentation your operating system to prevent feedback will block that audio from the microphone. To succeed in playing audio as a part of the presentation have a look at the solutions documented at Hopin support page on Sharing Computer Audio During an Event

